Sunday, July 3, 2022

How to Search Google from the Command Line


Probe the world's most popular search engine without leaving the terminal


https://www.omgubuntu.co.uk/2021/11/best-command-line-tools-ubuntu-linux

https://www.omgubuntu.co.uk/2017/08/search-google-from-the-command-line

How to Search Google from the Command Line

google from the terminal

Got a hankering to search Google from the command line? If so you’re going to love this nifty terminal tool.

It’s called Googler and (as you can probably guess) it’s a command-line tool that lets you search Google (the search engine) from a terminal emulator app of your choice.

You’re not limited to regular Google web searches either. This python-based tool also lets you use Google site search, and can probe Google News for content that matches your chosen query(s).

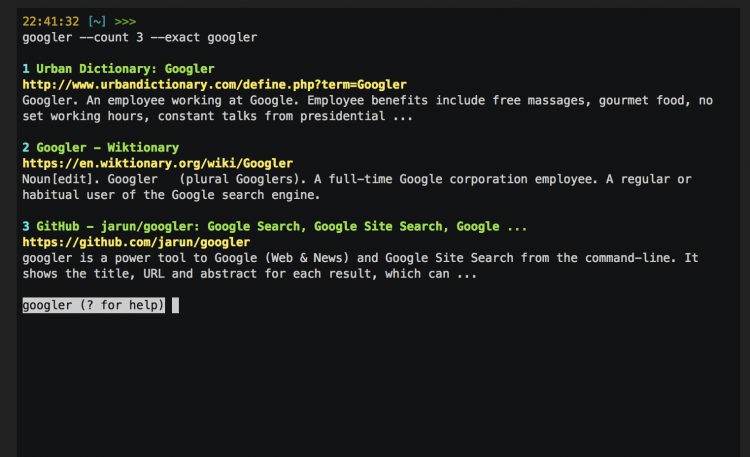
As a search tool the way search results are presented to you is important, and thankfully is one area where this app really delivers.

When you search from the command-line using Googler you’re presented with a list of search results that show the title, URL and a short text snippet. You can quickly open any result in a web browser by entering the number that corresponds to the result you want to read.

A stack of other search options and parameters are available for more advanced users. These let you search for an exact phrase, search a specific version or Google, and/or narrow down search results based on a specific time period.

Now, I’m not for one moment suggesting that Googler (or command line search in general) is the most practical way to find stuff on the web. It’s not. But it is novel, inventive, and, for those who spend a lot of time staring down a blinking underscore at the command line, pretty handy in a pinch.

Search Google from a Terminal

Googler was created to let people make web searches on a headless server lacking an X session, where it could integrate neatly with a text-based browser. In such situations it provides a fully immersive command-line web search experience.

But the inherent niftiness of the tool, combined with the novelty of being able to Google from the terminal, has seen it pick up an army of admirers on the regular desktop too — and a boat load of new features to boot.

You can limit the number of results; define an alias to perform site searches (e.g., omgubuntu plank themes; use a specific locale version; and, well, a bunch more besides!

I must stress that Googler is not affiliated, endorsed or supported by Google itself. It’s an unofficial, unrelated, third-party project. It is open-source. Code is available on Github.

Install Googler on Ubuntu

To install a working version of Googler on Ubuntu 18.04 LTS and above you just need to download the latest release directly from Github:

Download Googler 1.4.2 for Ubuntu 18.04 (64-bit)

Once the installer above is fully downloaded go ahead and open it using Ubuntu Software. Follow the on-screen prompts to install Googler on your system.

Once installed, Googler is immediately available, ready for you to use. To get started pop open your favourite terminal emulator and punch in the single command:

googler

Googler will then prompt you to enter a search query. Quickly type a phrase or two and hit the return key. The app will print a list of matching results.

Want to go further?

Google CLI Search Options

Googler may be effortlessly simple to use, but for the times you need more finesse and control over search results there are a stack of options ready to assist.

You can type googler --help to see a full list of available arguments, options, and flags. Or, if you’re lazy, you can see them in this image:

googler commands

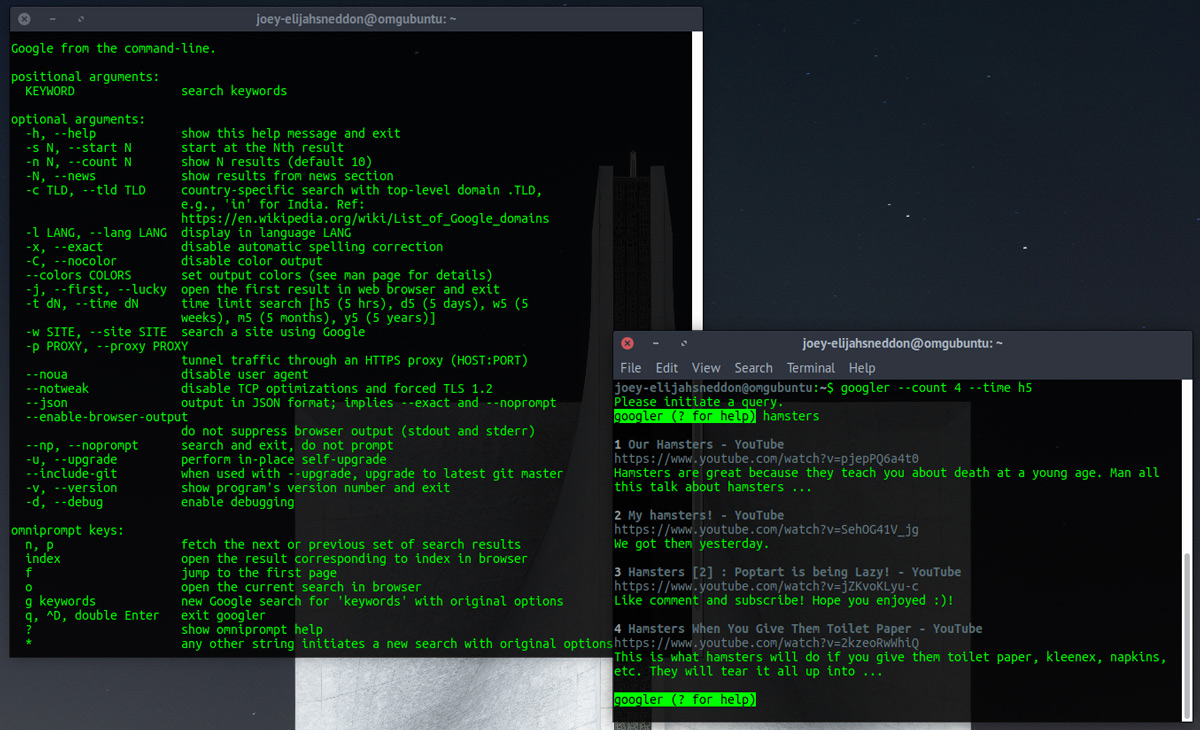
The ones I find most useful are --count and --time which (shock) lets you limit how many search results you see, and the time period from which they’re chosen.

So, for example, I I want to see the top 4 results about hamsters, limited to things published in the last 5 hours, I run:

googler --count 4 --time h5 hamsters
google command line search using Googler on Ubuntu

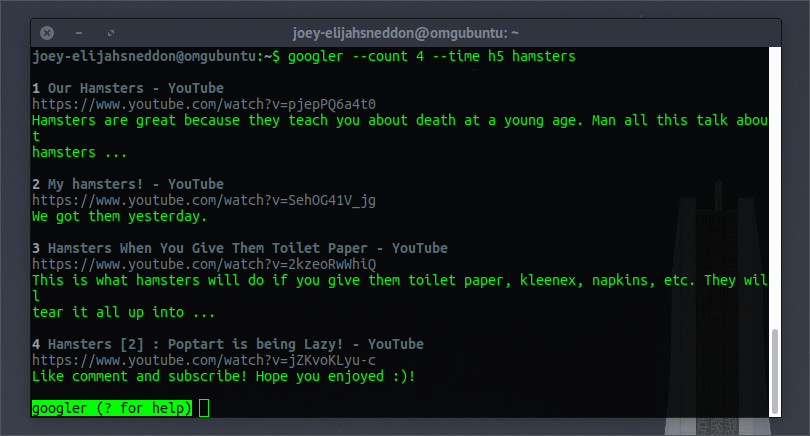
Simple enough, isn’t it?!

Got a top terminal tool you think we should write about? Stuff a link and some info in our mailbox and we’ll check it out.


Saturday, January 8, 2022

Kali Linux help on how to Use & Search Wikipedia on a Linux Terminal by using a command by Ranger Smyth 08 Jan, 2022.

 I will post up my findings after doing some research into the package and to test it against ease of use.


##################################

 Taken Directally from https://helpdeskgeek.com/linux-tips/10-cool-linux-terminal-commands-you-have-to-try/

Use & Search Wikipedia In Linux Terminal

Many people use Wikipedia to search through its vast database of knowledge for information. Google often pushes Wikipedia toward the top of search engine results to help users find what they are looking for quickly.

Linux users can save a lot of time by accessing Wikipedia in the terminal. Use Wikit to get answers to your questions quickly inside your Linux distribution.

The Wikit Linux terminal command line will show users summaries of search topics from Wikipedia. Start by installing Node.js on your machine.

Run the following commands on Mint systems, Ubuntu, or Debian:

sudo apt-get install nodejs
sudo apt-get install npm

To install Wikit, run the following simple command:

sudo npm install wikit -g

After you have installed Wikit, get Wikipedia summaries by running the following command:

wikit <search query>

Note that you can also use multi-word queries.


Taken directally from https://github.com/KorySchneider/wikit


wikit on GitHub

A command line program for getting Wikipedia summaries easily.

Installation

1. $ npm i wikit -g

. or Git Clone to you system

2. $git clone https://github.com/KorySchneider/wikit.git

Usage

Syntax: $ wikit <query> [-flags]

Quotes are not required for multi-word queries.

To change the default language, edit ~/.config/configstore/wikit.json.

Examples

$ wikit wikipedia

$ wikit empire state building

$ wikit linux -b

$ wikit jugo -l es --link -a


Thursday, December 30, 2021

Kali Linux help with installing eDEX-UI v2.2.8 hackers terminal !! This will impress the friends and hence I call it a Linux Magic Trick by Ranger Smyth, 28 Dec 2021.


eDEX-UI v2.2.8

GitSquared/edex-ui - Giters


image Peek 2019-04-18 17-52


Latest news about eDEX. It seems that the time has come for this package to go into retirement. But, we can still download it and have it to work for us.

Installed in the package are a few different themes, Tron, Matrix and a few others.

https://github.com/GitSquared/edex-ui/releases/download/v2.2.8/eDEX-UI-Linux-x86_64.AppImage Download the 64 Bit package for Linux. 

Get all the other packages for different OS here edex-ui/releases/tag/v2.2.8


2.2 Patch 8
point_down

edex-ui · GitHub Topics · GitHub 

How to install and run eDEX-UI

Get all the packages for different OS here edex-ui/releases/tag/v2.2.8

1. Download the package on to you computer. 

   It normally saves in the Download folder.

2. After download, right click on the file and go to permissions.

3. Make sure all options are read and write for all.

4. Most important to click the check mark 'Make this app executable'

5. Close the window and double click on the file.

6. It should take a few seconds for it to open. 

7. Tell your friends that this is a CIA terminal and as they do not use it any-more, its available on the darknet.


Thank you and well done for making it this far, like me you have a long road of learning ahead of you. Now the packages are installed, it's time now to start to learn how to use them, being honest I have installed many packages but do not know how to use them. So a plan of learning one a day will help me to catch up.

What did we learn today? We learnt how to install an app_image file from GitHub and how to make the file executable.

 
Be safe,
Ranger.
https:icanhelp.ie


Kali Linux help with how to install and run Photon Web Scraper by Ranger Smyth, 30 Dec 2021.

How to Install Photon.

https://camo.githubusercontent.com/f4427ac8c4525ddec9a937d856c6e3c2543900e7d988848f3abd20c30c4fe1c7/68747470733a2f2f696d6167652e6962622e636f2f6b515355637a2f64656d6f2e706e67

 Planning is an essential phase to any hack. If you have a target website and you wanted to mine it for information, having the right tool capable of scraping for OSINT data is priceless.

To install Photon. 

https://github.com/s0md3v/Photon 

$ sudo git clone https://github.com/s0md3v/Photon.git
$ cd Photon
$ ls
$ sudo pip install -r requirements.txt


 Photon

Now to test to see if Photon has installed. 

$ python3 photon.py --help

If this worked then you should see the below logo with a help menu.

To ask Photon to gather information from a website.

$ sudo python3 photon.py -u http://www.example.com -l 3 -t 200 --wayback

If this worked then you should see the below logo along with the results.


Well done on getting it to work!!


Photon | Information Gathering Tool | OSINT | Latest Version : 1.3.2 | Kali Linux

https://youtu.be/iBBZ41FfM3M


Incredibly fast crawler designed for OSINT. I must give thanks to the creator of this tool. 
 
This Download Link: https://github.com/s0md3v/Photon 
Only Education Purpose Not Illegal Use OK 
We are Upgrade To Our Ethical Hacking And Penetration Testing skills
 
 
=====================================================  

Use Photon Scanner to Scrape Web OSINT Data [Tutorial]

https://youtu.be/pJDJwD8GCIg On this episode of Cyber Weapons Lab, we'll introduce you to such a tool called Photon Scanner.


Check out their full tutorial here Use Photon Scanner to Scrape Web OSINT Data

Follow Null Byte on:

Twitter: https://twitter.com/nullbytewht

Flipboard: https://flip.it/3.Gf_0

Weekly newsletter: https://eepurl.com/dE3Ovb 

Subscribe to Null Byte: https://goo.gl/J6wEnH

Kody's Twitter: https://twitter.com/KodyKinzie


Thank you and well done for making it this far, like me you have a long road of learning ahead of you. Now the packages are installed, it's time now to start to learn how to use them, being honest I have installed many packages but do not know how to use them. So a plan of learning one a day will help me to catch up.

What did we learn today? We learnt how to install a GitHub file, then to install the requirements and then to test the package with a website.

 
Be safe,
Ranger. 
@ranger_smyth


How to Search Google from the Command Line

    Probe the world's most popular search engine without leaving the terminal   https://www.omgubuntu.co.uk/2021/11/best-comman...